
There may be no way around it: describing, in a meaningful way, my experiments with batch scanning for mass digitization does not lend itself to short blog posts. One of the audiences we hope to reach with the Morton blog is practicing archivists, especially those exploring the realm of mass digitization. If you are not an archivist, or someone interested in scanning large quantities of material, I will not blame you if you stop reading here!
The second installation of this series on scanning slides for mass digitization discussed the issues with film scanners that produce high quality scans but at unacceptably slow speeds. Using the Nikon Coolscan film scanner was one of two approaches I explored with equipment on-hand. The second method investigated, the focus of this post, was the possible use of a good quality flatbed scanner—an Epson Expression 10000XL Photo model running Silverfast Ai scanning software, which has a batch scanning mode.
Using a flatbed scanner addresses the need to scan more than five slides at a time, a serious limiting factor for the Nikon Coolscan. (To be fair, the Coolscan was not designed for volume scanning.) The hope for the flatbed scanner was that in batch mode we might be able to produce image files that would be adequate for online access and basic reproduction requests at a higher rate of throughput. The 10000XL comes with two slide holders that, in total, hold thirty slides; bypassing the holders and laying the slides directly on the flatbed expands that number to forty-eight. Note that laying slides on a scanner’s flatbed only works if the scanner has an adjustable focusing mechanism, because not all slide mounts are the same thickness and the film does not rest on the surface of the flatbed. A fixed-focus scanner, therefore, may produce out-of-focus scans.
My test sample was a varied batch of slides from the 1950s and 1960s that has two sets of handwritten numbers on the mounts and were likely from slide presentations. This group represented a variety of subject matter, lighting conditions, film emulsions, and exposure latitudes (slightly overexposed to slightly underexposed).
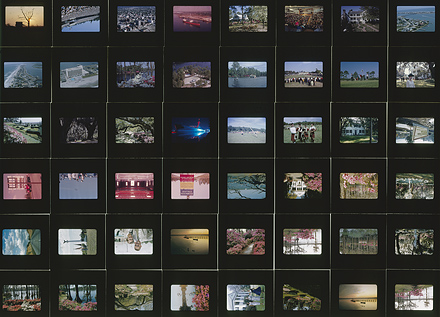
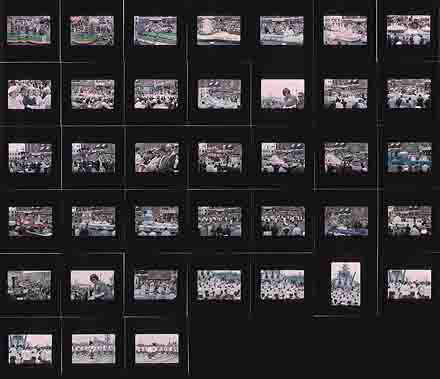
I tried two methods: scanning each slide individually using the Silverfast batch mode, and scanning multiple slides as one large file. The scan above is a single image file of forty-eight slides laid out on the flatbed. The scan that follows, made from a different set of slides, uses Epson’s slide holders. (The scan below has two slide openings that are unfilled. That’s because I loaded the slides in numerical order, and two slides were missing.)
Silverfast’s batch mode requires the operator to draw a selection rectangle around each image, as seen in the detailed screen shot below. Though tedious, an advantage of selecting and then scanning individual frames is that an automatic or manual tonal and/or color adjustment can be applied to each slide. A disadvantage is that an automatic or manual tonal and/or color adjustment can be applied to each slide. Does that—being both an advantage and a disadvantage— sound like doublethink? Well, the added step to gain better image quality extends the amount of time it takes to set up each slide. A straight, unadjusted scan from the preview may be faster, but it’s usually not acceptable “as is.” Some tweaking of the preview scan—”preprocessing”—is required to get the final scan close to where you want it. You just can’t labor over it!
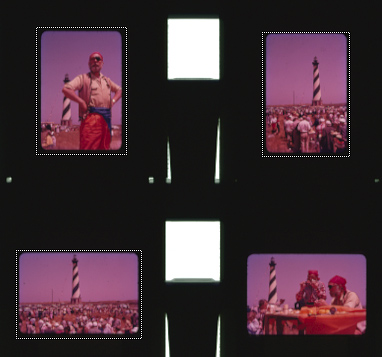
Note in the illustration above (made from a different set of slides) the dotted rectangular selection boxes. Note, too, the odd color cast that is the result of the film emulsion’s color dyes shifting over time. This is one reason why you need to make adjustments to raw scans, even if they are very close approximations of the original slides. Here’s an adjusted version, corrected after scanning (“post-processing”), of one of the images above:
One nice aspect about individual scans, however, is that once you click on the “Scan” button you can walk away from the scanner for forty-five minutes and do something else . . . like eat a hearty lunch.
Scanning multiple slides as one image file presents several dilemmas:
At what resolution do you scan the batch? I chose an equivalent of what the Nikon Coolscan would generate—4,000 pixels per inch. That creates a very large file, around 1.25 gigabytes for an 8-bit scan, for forty-eight slides. We experimented with downsizing the file to a presentable JPEG for Web display. Adequate, but it’s another layer of work that drags out the process.
To reduce that workload, several steps could be set up as an “action” in Photoshop where the software records individual steps as a programmed script that can be applied to subsequent batches, even whole directories of image files. You just need to be meticulous to the point that the scans are made so they will look the way you want them to look afterward.
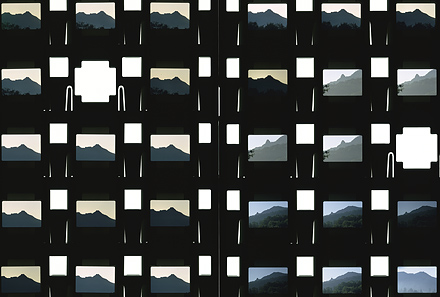
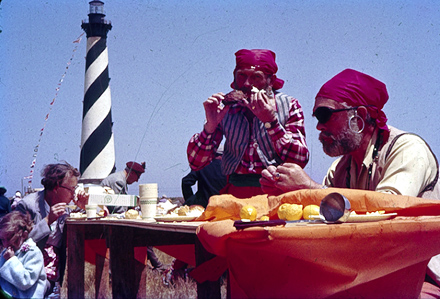
Scanning a batch of slides laid out on a flatbed as one large file produces a lot of dead, black space where the slide mounts do not allow the light through. Using the Epson slide holders creates even more dead space, only it is a mixture of black and white dead space (see illustrations above). Using Photoshop, we experimented with cutting out the images and pasting them into new Photoshop documents. That’s better looking, easier to make tonal adjustments for individual items (see the hungry pirates), and better suited to item-level descriptive indexing, but again, more production work that defeats any gains made by batch scanning. And you have to remember to flatten the file or the resultant file size is quite a bit larger.
What if a batch to be scanned could be limited to a common subject and thus be described as a whole? That would work only so long as the batch has some underlying commonality. The disparate group of slides I scanned did not lend itself to group description. In addition to the pirates at Hatteras, I did scan a batch of slides from an Azalea Festival parade as a second sample. But each grouping had a different number of items. Small groupings compared to larger ones could potentially lead to sloppy online presentation.
While I have a bunch of facts and figures related to scan times and file sizes using both methods, the biggest dilemma of all is an inherent flaw in all but the top-of-the-line flatbed scanners: the lack of edge-to-edge sharpness. In the end, quantitative statistics are moot because of that flaw.
Most scanners have a strip running through the center of the scanning area, its “sweet spot,” that produces its best quality scan. Once you move outside of that sweet spot, image quality drops off—extremely so in the corners. On the Epson 10000XL in our shop, the sweet spot seems to be in the center, falling off gradually to its worst in the corners. Scans of slides outside the zone have a soft, blended pastel look reminiscent of looking through a shower door with textured glass.
Here is a full scan, from the upper right corner of the batch of scans in the opening illustration. The scan below is a 100 percent crop that I then reduced to 440 pixels wide:

The result is perfectly satisfactory for online display at 440 pixels wide. But the devil is in the details! Here are two 100% crops, not sharpened, displayed at 440 pixels wide:
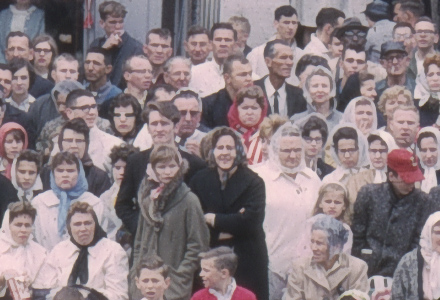
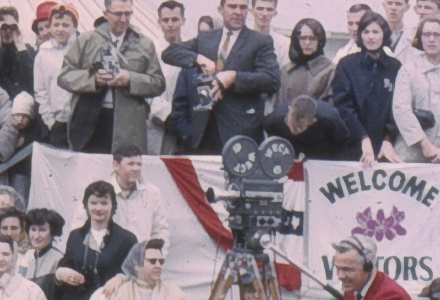
See the flat, distorted appearance of people’s faces? Note the lack of detail in the camera and tripod? If our only intended use of the scans was online display, this batch approach would suffice; for reproduction, however, they are clearly unsatisfactory.
Batting 0-for-2, it was time to plow through the Internet for a better solution. We think we’ve found one . . . the subject of the next post.
I appreciate your work. I have at least 15,000 kodachrome slides taken from 1978 to 2004 that I are
documented and might be useful to others. I am sorting and discarding many. I would donate them to
a university or non-profit after converting them to digital.
I purchased a PowerSlideX scanner and Siverfast software for bath scanning. I am having a really hard time trying to figure out a workflow. I will be 90 years old on my next birthday and do Ok with Photoshop and Lightroom but am not very computer smart. do you know where I might find a very straightforward workflow — like which button to push after I disable the regular button on the upper left side. I am not finding the information from SilverFast easy to understand.
Any suggestins you have would be very much appreciated. I have used SilverFast with my Nikon Coolsan — just cannot get started with the batch processing. I think there are a lot of folks like me who would appreciate archiving and sharing their work.
Thank you for listening.
Mary Westerback mwesterback@wavecable.com
Mary Wessterback mwesterback@wavecablelcom